|
|
|
Version .2c
Revision history:
v.2 – changed the link to the LAME mp3 codec, new link
is more reliable and stays more up to date., also
added a link to the treo600 patch.
Intro junk:
This guide is my own property; please do not redistribute this guide, just link to my website. This way if I update the guide all those that view it will be reading the same updated version.
In this guide I’ll cover how to rip a DVD onto your PDA for use with mmplayer. You need to have at least 7GB of free hard drive space for this, the resulting movies will be smaller but the initial rip from the DVD will take up a lot of space. If you’re just looking to reconvert an AVI file for use with your PDA you can skip the first two major sections. One final note is that I wrote this guide specifically for treo600 users, everything in here will work for any other pda, but the final movie will be using a final resolution of 160x120, for high resolution devices (and faster devices) you may select higher resolutions and/or higher quality audio options.
For starters you will need to download some stuff:
A copy of DVD decrypter from http://www.dvddecrypter.com/download.asp
A copy of FlasK MPEG from http://flaskmpeg.sourceforge.net/?inc=downloads
(I personally use 0.78.39 beta)
A copy of Virtualdub from http://www.virtualdub.org/download
The DivX codec from http://www.divx.com/divx/
The Lame mp3 codec from http://mitiok.cjb.net/
(to
install the Lame codec extract all the files from the zip into the same
directory, go into the “ACM” directory then right click on LameACM.inf
and select “install”)
Attention Treo600 users! Check out this thread for a patch to fix audio problems: http://mmplayer.com/forums/viewtopic.php?t=807&start=16
What kind of movies work best? Well, I find that animated material works the best (anime, cartoon, etc.) the simple scenes and exaggerated facial emotions lend well to the small screen of a PDA.
Okay onto the guide!
To Hell With
Encryption!
First thing we need to do is rip the .vob files from the DVD, for this task we’ll use DVD decrypter. DVD decrypter will not only copy files from the DVD but it will, as the name suggests, remove any encryptions present.
 This
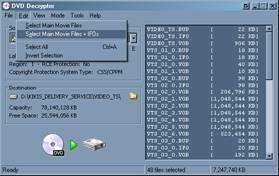
is a pretty easy setup, put your DVD into your DVD drive, open up DVD Decrypter
and under the edit menu select the option “Select Main Movie Files + IFOs.”
This
is a pretty easy setup, put your DVD into your DVD drive, open up DVD Decrypter
and under the edit menu select the option “Select Main Movie Files + IFOs.”
If your resulting movie has skips where a scene is replayed but with different elements; such as the text in the scene changes languages, you’ll want to set DVD decrypter to only copy one angle from the movie. Certain movies will have different “Angles” which are used for different things including multi-language support.
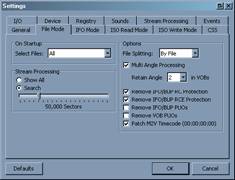
You can adjust which angle is converted by under the “Tools -> Settings” menu option, in the new windows that comes up select the “File Mode” tab. Check the box next to “Multi Angle Processing” and select which angle you want from the dropdown, you may have to try a couple times to get the right “Angle.”
After DVD decrypter finishes copying the .vob files I would highly recommend opening them up in a DVD program to make sure they were copied properly.
Must Conserve Hard-drive Space!
 .Vob
files are way too large to keep around, so we’ll convert them into a much more
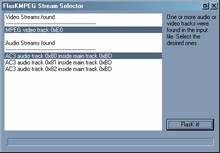
manageable avi file. The program of choice here is FlasKMPEG. Open FlaskMPEG up
and drag and drop the first (numerically) .vob file into it; A window will pop
up entitled “FlaskMPEG Stream Selector” this is where you’ll pick which audio
language you want; typically, English is the first stream. So select which
audio stream you want and hit “FlasK it!”
.Vob
files are way too large to keep around, so we’ll convert them into a much more
manageable avi file. The program of choice here is FlasKMPEG. Open FlaskMPEG up
and drag and drop the first (numerically) .vob file into it; A window will pop
up entitled “FlaskMPEG Stream Selector” this is where you’ll pick which audio
language you want; typically, English is the first stream. So select which
audio stream you want and hit “FlasK it!”
 Now
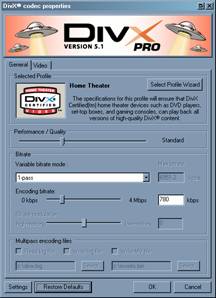
we should be at the main screen, select from the menu “Options -> Output
option” From the list of video codecs select “DivX Pro™ 5.1 codec” and hit the
“Configure” button. For our initial conversion I recommend hitting the “Select
profile wizard button” in the new window select the
“Home Theater” profile and hit next, don’t change anything in the following
screen, just hit “finish.” This will return us back to the initial DivX
configuration window, I would recommend using the default settings (you can get
them back by hitting the “Restore Default” button along the bottom). Then
select “OK.”
Now
we should be at the main screen, select from the menu “Options -> Output
option” From the list of video codecs select “DivX Pro™ 5.1 codec” and hit the
“Configure” button. For our initial conversion I recommend hitting the “Select
profile wizard button” in the new window select the
“Home Theater” profile and hit next, don’t change anything in the following
screen, just hit “finish.” This will return us back to the initial DivX
configuration window, I would recommend using the default settings (you can get
them back by hitting the “Restore Default” button along the bottom). Then
select “OK.”
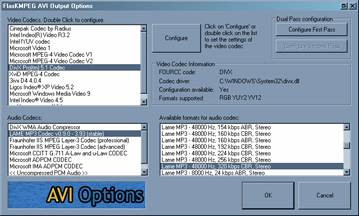 We
should now be back at the codec selection screen, now we need to select an
audio codec. In the “Audio Codecs” window select the “LAME MP3 Codec.” In the
right window select what bitrate you would like, I prefer “48000hz, 320 kbps,
CBR, stereo” since its high quality will make for a good base later on when we
down-convert again.
We
should now be back at the codec selection screen, now we need to select an
audio codec. In the “Audio Codecs” window select the “LAME MP3 Codec.” In the
right window select what bitrate you would like, I prefer “48000hz, 320 kbps,
CBR, stereo” since its high quality will make for a good base later on when we
down-convert again.
Now to set some other options . . . from the main FlasKMPEG window select from the menu “Options -> Advanced options.”
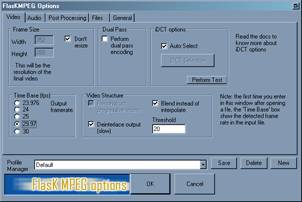 In
the new window that comes up select the “Video” Tab. Make sure the “Don’t
resize” checkbox is unchecked. Select 29.97 for the output frame rate
(this will come in handy later) and then check the boxes next to “Deinterlace
Output” and “blend instead of interpolate.”
In
the new window that comes up select the “Video” Tab. Make sure the “Don’t
resize” checkbox is unchecked. Select 29.97 for the output frame rate
(this will come in handy later) and then check the boxes next to “Deinterlace
Output” and “blend instead of interpolate.”
Next, select the “Audio” tab; ensure that the bullet next to “Decode audio” is selected. After that, select the “Post processing” Tab; Select “HQ bicubic filtering” and make sure the checkboxes next to “No crop” and “No letterboxing” are checked. Then select the “files” tab and set where to save the file to and what to name the file. Finally, select the “General” tab and ensure that the “compile whole file” checkbox is checked and set the “search size (KB)” to 5000.
Hit the “OK” button to return to the main screen and then hit the “FlasK it!” button to start converting the movie. This will take a while so feel free to sleep, run errands, grab lunch or whatever.
After this finishes, check your newly created .avi file for errors, if everything came out correctly you can now delete the .vob files you copied from the DVD earlier.
But I Want My PDA To Play The Movie!
The reason we are going to convert the DVD twice is that if your final file doesn’t come out right you can re-encode the initial .avi file again which will take several hours less time then re-encoding the .vob files. So now then on to the final conversion!
Open up VirtualDub and drag n’ drop your .avi file into it.
First things first, the video! In the menu select “Video -> Full processing mode”
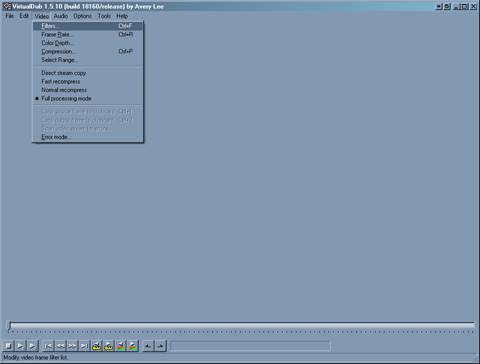
 Now,
again go to the menu and select “Video -> Filters,” this will bring up the
filters window, click the “Add” button and double click on resize, this will
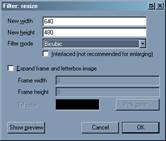
open up a resize window. Most DVDs are encoded at 720x480, so we want to resize
this to a more friendly size of 640x480. If your initial .avi file is smaller
than 640x480 set the size to 320x240, if smaller than that set it to
160x120.Set the filter mode to
Now,
again go to the menu and select “Video -> Filters,” this will bring up the
filters window, click the “Add” button and double click on resize, this will
open up a resize window. Most DVDs are encoded at 720x480, so we want to resize
this to a more friendly size of 640x480. If your initial .avi file is smaller
than 640x480 set the size to 320x240, if smaller than that set it to
160x120.Set the filter mode to
”Bicubic” and Select “OK”. . .on to the next step!
You should still be in the filters window, now select add again, this time you want to double click the “2:1 reduction (high quality)” filter. If you set the resize to 640x480 you’ll want to add a second one of these, if you set the resize to 160x120, you do not want to add any of these reductions.
This may seem like the roundabout method of reducing the overall resolution, but I find this set of filters works better than a straight reduction to 160x120.
Okay, we’re now done with the filters, so select okay to return to the main screen. Next, select “Video -> Frame rate,” the Frame rate window should now be open, if you’ve use this guide to rip the DVD you’ll want to select “Process every other frame (decimate by 2)”. If you’re converting some other avi file or you did not convert the DVD into a 29.97/30fps avi you’ll want to select “Convert to fps” and enter “15” into the box. Hit the “OK” button to return to the main screen.
Now to select the compression, in the menu, select “Video -> Compression.” In the compression window select DivX 5.1 and hit the “Configure” button. This time, hit the “Select profile wizard” and select the handheld profile and press the “Next” button. Again do not enter anything in the next window, just press “Finish.” You should now be at the DivX configuration window again, set the “Encoding bitrate” to 128kbps (max setting) and hit the “OK” button and at the “Select video compression” window select “OK” again to return to the main menu. We are now done with the video side.
For the audio, select “Audio -> Full processing mode” from the menu.
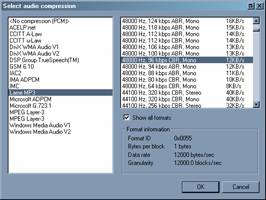
Next in the menu select “Audio -> Compression” in the new window, select “Lame MP3” in the left pane and then check the box “Show all formats.” I myself prefer “48000Hz, 96kbps, CBR, mono 12KB/s.” Select the “OK” button . . . we are all set to go!
Now you should be back to the main windows, so now under the “File” menu, select “save as avi” and find a place to put your new .avi file, then hit save. After this finishes converting your movie you are now finished, after you have made sure your copy is working, you can delete your initial .avi file (the large one.)
Happy movie viewing!